1. 使用 nginx-rtmp-module 搭建 RTMP + HLS 流媒体服务器
(1) 最简单方式安装
我们使用 Nginx 作为视频流服务器,那么必须需要 Nginx 支持视频流,这里就需要安装 nginx-rtmp-module 模块了,libnginx-mod-rtmp 是 nginx-rtmp-module 模块在 ubuntu 库中的名称,这个模块在 ubuntu 18.04 上是自带的,可以通过 apt-get install libnginx-mod-rtmp 进行安装,但是在 ubuntu 16.04 上如果想要安装,直接下载 libnginx-mod-rtmp_1.14.0-0+xenial1_amd64.deb 安装的话会被告知 nginx 版本过低,依赖有问题,16.04自带的nginx版本是1.10,而rtmp需要1.14版本。
安装 nginx-rtmp-module 模块大部分都是编译 nginx 和 nginx-rtmp-module 来安装的,如果你不想编译安装,可以通过升级 nginx 到 1.14 版本,然后再使用 apt-get install libnginx-mod-rtmp 命令安装 libnginx-mod-rtmp 就可以了。
1. 升级nginx到1.14
依次运行如下命令:
sudo apt-get install software-properties-common python-software-properties
sudo add-apt-repository ppa:nginx/stable
sudo apt-get update
sudo apt-get install nginx
2. 安装libnginx-mod-rtmp
sudo apt-get install libnginx-mod-rtmp
这样就成功在Ubuntu 16.04上安装了 libnginx-mod-rtmp。
(2) 编译安装 nginx-rtmp-module
1. 下载 nginx-rtmp-module:
nginx-rtmp-module 的官方 github 地址:https://github.com/arut/nginx-rtmp-module.git
2. 编译安装 Nginx
nginx 的官方网站为:http://nginx.org/en/download.html
本文使用的是 nginx-1.14.2,安装 Nginx 需要依赖其它第三方库,需要先下载编译好:
(1) zlib库
官网地址为:http://www.zlib.net/ ,本文采用的版本为 zlib-1.2.11。
wget http://www.zlib.net/zlib-1.2.11.tar.gz
tar xf zlib-1.2.11.tar.gz
cd zlib-1.2.11
./configure
make && make install
(2) openssl库
官网下载地址:https://www.openssl.org/source/ ,本文使用的版本:openssl-1.1.0j。
wget https://www.openssl.org/source/openssl-1.1.0j.tar.gz
tar xf openssl-1.1.0j.tar.gz
cd openssl-1.1.0j
./config
make && make install
(3) pcre库
官网下载地址:ftp://ftp.csx.cam.ac.uk/pub/software/programming/pcre/ ,本文使用的版本:pcre-8.38。
注意:pcre 库建议不要使用 pcre2 系列的版本,会导致 Nginx 编译报错的问题。
wget ftp://ftp.csx.cam.ac.uk/pub/software/programming/pcre/pcre-8.38.tar.bz2
tar xf pcre-8.38.tar.bz2
cd pcre-8.38
./configure
make && make install
(4) 编译安装Nginx
官网下载地址:http://nginx.org/en/download.html ,本文采用的版本为:nginx-1.14.2。
wget http://nginx.org/download/nginx-nginx-1.14.2.tar.gz
tar xf nginx-nginx-1.14.2.tar.gz
cd nginx-nginx-1.14.2
./configure --prefix=/usr/local/nginx --add-module=../nginx-rtmp-module --with-http_ssl_module  --with-pcre=../pcre-8.38 --with-openssl=../openssl-1.1.0j --with-zlib=../zlib-1.2.11
make && make install
执行完以上步骤,如果不出错误的话,Nginx 编译出来会生成到 /usr/local/nginx 目录。
最后启动nginx:
cd /usr/local/nginx/
sbin/nginx -c conf/nginx.conf
或者
/usr/local/nginx/sbin/nginx -c /usr/local/nginx/conf/nginx.conf
2. 使用 nginx-http-flv-module 搭建 RTMP + HTTP-FLV 流媒体服务器
编译安装方法和编译安装 nginx-rtmp-module 相似,只不过 nginx-http-flv-module 模块和 nginx-rtmp-module 模块不能一起使用,安装 nginx-http-flv-module 模块时先把 nginx-rtmp-module 卸载了,最后的编译命令如下所示:
./configure --prefix=/usr/local/nginx --add-module=../nginx-http-flv-module-master --with-http_ssl_module --with-pcre=../pcre-8.38 --with-openssl=../openssl-1.1.0j --with-zlib=../zlib-1.2.11
3. 推流和播放测试
打开 nginx.conf 配置文件,在最下面添加如下配置:
rtmp {
    out_queue     4096;
    out_cork         8;
    max_streams    128;
    timeout        15s;

    server {
        listen 1935;
        chunk_size 4096;

        application live {
            live on;
            max_connections 1024;
            gop_cache on;
        }

        application hls {
            live on;
            hls on;
            hls_path /etc/nginx/temp/hls; // 这里的路径要写成你的路径,用来存放 hls 视频片段,如果没有这个目录需要自己新建,而且必须是绝对路径,否则可能会获取不到视频数据
            hls_fragment 5s;
        }
    }
}
配置写好之后,重启 Nginx 服务器:
sudo nginx -s reload
现在我们的视频流服务器就搭建好了,我们来测试一下。
这里先说明下我的视频流服务器地址是:192.168.9.12;
原始视频流是海康的摄像头,地址是:rtsp://admin:123456@192.168.9.33:554/Streaming/Channels/101
原视频流 rtsp 播放测试:

如果没有原始视频流地址,可以使用 MP4 等视频文件进行推流。
3.1 使用 RTMP 播放
我使用 ffmpeg 进行推流,推流命令写成:
ffmpeg -i rtsp://admin:123456@192.168.9.33:554/Streaming/Channels/101 -f mp4 -vcodec copy -r 25 -s 1920*1080 -b:v 1024000 -an -f flv -an rtmp://192.168.9.12:1935/live/stream
这里重点注意推流的地址:rtmp://192.168.9.12:1935/live/stream,其中的 live 要和你的配置文件中 live 相对应,后面的 stream 可以随便写,这样你就可以使用播放器进行播放了,比如使用 vlc 进行播放,如下图所示:

3.2 使用 HLS 播放
如果你想使用 hls 来播放视频,还需要在 nginx.conf 配置文件中的 http 模块中添加一个 server,这里我们监听 8080 端口,如下所示:
server {
    listen 8080;
    server_name  localhost;

    location /hls {
        #server hls fragments
        types{
            application/vnd.apple.mpegurl m3u8;
            video/mp2t ts;
        }
        #alias temp/hls;
        root /etc/nginx/temp;  // 这里的路径要和 rtmp 配置中的路径一致
        expires -1;
        add_header Cache-Control no-cache;
        add_header Access-Control-Allow-Origin *;
    }
}
配置好了之后,再次重启 Nginx 服务器。
这次推流命令还是上面的命令:
ffmpeg -i rtsp://admin:123456@192.168.9.33:554/Streaming/Channels/101 -f mp4 -vcodec copy -r 25 -s 1920*1080 -b:v 1024000 -an -f flv -an rtmp://192.168.9.12:1935/live/stream
但是我们的播放地址改变了,我们使用 HTTP 协议播放,地址为:`http://192.168.9.12:8080/hls/stream.m3u8`,如下图所示:

3.3 使用 HTTP-FLV 播放
使用 HTTP-FLV 播放不需要再增加其他配置了,但是上面的两部分配置都是必须的,而且要确保你是编译安装的 nginx-http-flv-module 模块。
根据 https://github.com/winshining/nginx-http-flv-module 中的介绍,这里的播放地址我们得写成这种格式:`http://192.168.9.12:8080/live?app=live&stream=stream` 才行,如下图所示:

4. 注意事项
- rtmp 的配置必须放在 nginx 服务器的默认配置文件 nginx.conf 中,不可以自己新建一个配置文件包含进去,这样 rtmp 会不起作用。
-
配置文件中
hls_path /etc/nginx/temp/hls;这一项,这里的路径必须是绝对路径,否则可能会获取不到视频数据,我一开始写的./temp/hls,就一直播放不出视频来,找了好久问题才发现出现在这里 -
如果是在阿里云或者腾讯云上安装,记得要在安全组里打开 1935 端口。
5. 延时对比
http-flv和rtmp和rtsp播放延时对比
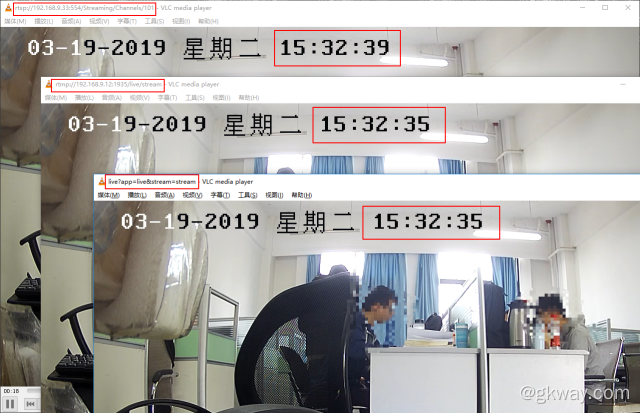
hls和rtmp和rtsp播放延时对比

http-flv和m3u8播放延时对比